动态内存与链表
约 1656 个字 592 行代码 3 张图片 预计阅读时间 13 分钟
功能:可增大、可获取大小、可访问
设计思想:
- 自定义类型一般不定义指针
- free 的对象是Array结构里面的数组
链表
可变数组的缺陷:内存受限场景下,反复重新申请大内存会有内存不够的情况
方法:申请block大小的内存,再次申请一个,将他俩链起来(告诉编译器下一块内存在哪里)
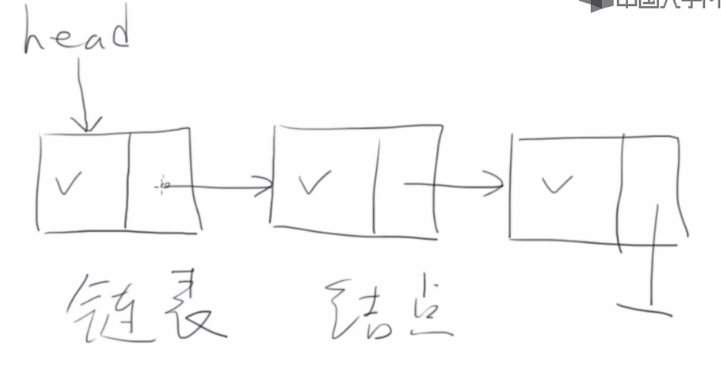
结点包含:数据、指向下一个的指针

语法:
在 Python 中,链表可以用类和对象来实现,因为 Python 本身没有像 C++ 或 Java 那样的内置链表数据结构。链表有两种主要类型:单向链表和双向链表。以下是关于它们的实现和操作的详细说明。
单向链表实现
定义单向链表:
class Node:
    def __init__(self, data):
        self.data = data  # 存储节点数据
        self.next = None  # 指向下一个节点

class LinkedList:
    def __init__(self):
        self.head = None  # 初始化头节点为空

    # 向链表末尾添加节点
    def append(self, data):
        new_node = Node(data)
        if not self.head:  # 如果链表为空
            self.head = new_node
            return
        current = self.head
        while current.next:  # 找到最后一个节点
            current = current.next
        current.next = new_node

    # 打印链表
    def print_list(self):
        current = self.head
        while current:
            print(current.data, end=" -> ")
            current = current.next
        print("None")

    # 删除值等于 data 的节点
    def delete(self, data):
        current = self.head

        # 如果要删除的是头节点
        if current and current.data == data:
            self.head = current.next
            current = None
            return

        # 找到要删除的节点
        prev = None
        while current and current.data != data:
            prev = current
            current = current.next

        if not current:  # 未找到节点
            print("Node not found")
            return

        prev.next = current.next
        current = None
使用示例:
# 创建链表
ll = LinkedList()
ll.append(1)
ll.append(2)
ll.append(3)

# 打印链表
ll.print_list()  # 输出: 1 -> 2 -> 3 -> None

# 删除节点
ll.delete(2)
ll.print_list()  # 输出: 1 -> 3 -> None
双向链表实现
定义双向链表:
class Node:
    def __init__(self, data):
        self.data = data
        self.next = None  # 指向下一个节点
        self.prev = None  # 指向前一个节点

class DoublyLinkedList:
    def __init__(self):
        self.head = None  # 初始化头节点为空

    # 在链表末尾添加节点
    def append(self, data):
        new_node = Node(data)
        if not self.head:  # 如果链表为空
            self.head = new_node
            return
        current = self.head
        while current.next:  # 找到最后一个节点
            current = current.next
        current.next = new_node
        new_node.prev = current

    # 从链表头部打印链表
    def print_list(self):
        current = self.head
        while current:
            print(current.data, end=" <-> ")
            current = current.next
        print("None")

    # 从链表尾部打印链表(反向)
    def print_reverse(self):
        current = self.head
        while current and current.next:
            current = current.next
        while current:
            print(current.data, end=" <-> ")
            current = current.prev
        print("None")

    # 删除值等于 data 的节点
    def delete(self, data):
        current = self.head

        # 如果要删除的是头节点
        if current and current.data == data:
            self.head = current.next
            if self.head:
                self.head.prev = None
            current = None
            return

        # 找到要删除的节点
        while current and current.data != data:
            current = current.next

        if not current:  # 未找到节点
            print("Node not found")
            return

        if current.next:
            current.next.prev = current.prev
        if current.prev:
            current.prev.next = current.next

        current = None
使用示例:
# 创建双向链表
dll = DoublyLinkedList()
dll.append(1)
dll.append(2)
dll.append(3)

# 打印链表
dll.print_list()  # 输出: 1 <-> 2 <-> 3 <-> None

# 反向打印链表
dll.print_reverse()  # 输出: 3 <-> 2 <-> 1 <-> None

# 删除节点
dll.delete(2)
dll.print_list()  # 输出: 1 <-> 3 <-> None
链表操作总结
- 插入操作: 可以在头部、尾部或中间插入节点。
- 删除操作: 需要更新相邻节点的指针。
- 遍历操作: 从头节点开始,依次访问每个节点。
链表的实现非常灵活,适合存储动态数据结构,适用于需要频繁插入和删除操作的场景。
在 C 中,链表可以用结构体和指针来实现。以下是单向链表和双向链表的实现和常用操作的详细说明。
单向链表
定义单向链表节点
#include <stdio.h>
#include <stdlib.h>

// 定义节点结构
struct Node {
    int data;              // 节点数据
    struct Node* next;     // 指向下一个节点的指针
};

// 创建新节点
struct Node* createNode(int data) {
    struct Node* newNode = (struct Node*)malloc(sizeof(struct Node));
    newNode->data = data;
    newNode->next = NULL;
    return newNode;
}
单向链表操作
- 插入节点到链表末尾
void append(struct Node** head, int data) {
    struct Node* newNode = createNode(data);
    if (*head == NULL) {  // 如果链表为空
        *head = newNode;
        return;
    }
    struct Node* temp = *head;
    while (temp->next != NULL) {  // 遍历到链表末尾
        temp = temp->next;
    }
    temp->next = newNode;
}
append函数超详解
函数原型
参数说明:
plist:指向链表结构的指针,用于表示要操作的链表。 -List是一个结构体,包含指向链表头节点的指针head。 - 通过传入List*,函数能够直接操作链表的内容(比如添加节点)。num:要添加到链表的新节点的值。
函数实现
void append(List* plist, int num)
{
    // 1. 创建一个新的节点并初始化
    Node* p = (Node*)malloc(sizeof(Node)); // 为新节点分配内存
    p->value = num; // 设置新节点的值
    p->next = NULL; // 新节点的 next 指针初始化为 NULL

    // 2. 找到链表的最后一个节点
    Node* last = plist->head; // 从链表头开始遍历
    if (last) {
        // 如果链表不为空,找到最后一个节点
        while (last->next) {
            last = last->next; // 循环向下,直到最后一个节点
        }
        // 3. 将新节点连接到最后一个节点
        last->next = p;
    } else {
        // 如果链表为空,将新节点作为头节点
        plist->head = p;
    }
}
详细分步解析
1. 创建新节点
- 动态内存分配:
- 使用
malloc分配一段内存,用于存储新节点。 - 返回值是
void*,需要强制类型转换为Node*。 - 初始化新节点:
p->value = num:将新节点的value字段设置为传入的值num。p->next = NULL:将新节点的next指针设置为NULL,表示它暂时是链表的最后一个节点。
2. 查找链表的最后一个节点
- 指针
last的作用: last是一个临时指针,用于遍历链表,找到当前链表的最后一个节点。- 初始时,
last指向链表的头节点(plist->head)。 - 判断链表是否为空:
- 如果
plist->head为NULL,说明链表为空,直接跳到else部分。 - 如果
plist->head不为NULL,说明链表中至少有一个节点,进入while循环。 while循环:last->next表示当前节点的下一节点是否存在。- 循环条件
last->next为真时,将指针last移动到下一个节点。
3. 连接新节点
- 当找到链表的最后一个节点时,将其
next指针指向新创建的节点p,这样p成为新的最后一个节点。
4. 处理空链表
- 如果链表为空(
plist->head == NULL),新节点p直接成为链表的头节点。
函数工作原理举例
假设链表初始状态为空,依次调用 append 函数,插入 3 个值:10、20、30。
初始状态
- 链表为空:
plist->head = NULL
第一步:添加 10
- 创建新节点
p,值为10,p->next = NULL。 - 因为链表为空(
plist->head == NULL),将plist->head指向p。 - 链表状态:10 -> NULL
第二步:添加 20
- 创建新节点
p,值为20,p->next = NULL。 - 遍历链表,找到最后一个节点(
10)。 - 将最后一个节点(
10)的next指针指向新节点p。 - 链表状态:10 -> 20 -> NULL
第三步:添加 30
- 创建新节点
p,值为30,p->next = NULL。 - 遍历链表,找到最后一个节点(
20)。 - 将最后一个节点(
20)的next指针指向新节点p。 - 链表状态:10 -> 20 -> 30 -> NULL
总结
append 函数的核心功能是向链表末尾添加一个新节点。主要步骤:
- 创建新节点,动态分配内存并初始化。
- 判断链表是否为空: - 如果为空,将新节点设为头节点。 - 如果不为空,遍历链表找到最后一个节点,并将新节点连接到最后。
- 打印链表
void printList(struct Node* head) {
    struct Node* temp = head;
    while (temp != NULL) {
        printf("%d -> ", temp->data);
        temp = temp->next;
    }
    printf("NULL\n");
}
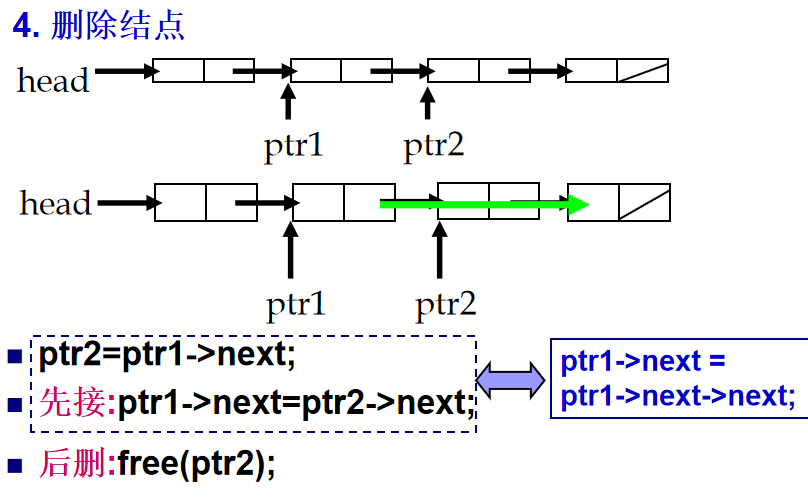
- 删除节点
void deleteNode(struct Node** head, int key) {
    struct Node* temp = *head;
    struct Node* prev = NULL;

    // 如果头节点需要删除
    if (temp != NULL && temp->data == key) {
        *head = temp->next;
        free(temp);
        return;
    }

    // 查找要删除的节点
    while (temp != NULL && temp->data != key) {
        prev = temp;
        temp = temp->next;
    }

    // 如果未找到节点
    if (temp == NULL) {
        printf("Node with data %d not found.\n", key);
        return;
    }

    prev->next = temp->next;  // 删除节点
    free(temp);
}
单向链表完整示例
int main() {
    struct Node* head = NULL;

    // 插入节点
    append(&head, 10);
    append(&head, 20);
    append(&head, 30);

    // 打印链表
    printf("Linked List: ");
    printList(head);

    // 删除节点
    deleteNode(&head, 20);
    printf("After Deletion: ");
    printList(head);

    return 0;
}
双向链表
定义双向链表节点
#include <stdio.h>
#include <stdlib.h>

// 定义双向链表节点结构
struct Node {
    int data;              // 节点数据
    struct Node* next;     // 指向下一个节点
    struct Node* prev;     // 指向前一个节点
};

// 创建新节点
struct Node* createNode(int data) {
    struct Node* newNode = (struct Node*)malloc(sizeof(struct Node));
    newNode->data = data;
    newNode->next = NULL;
    newNode->prev = NULL;
    return newNode;
}
双向链表操作
- 插入节点到链表末尾
void append(struct Node** head, int data) {
    struct Node* newNode = createNode(data);
    if (*head == NULL) {  // 如果链表为空
        *head = newNode;
        return;
    }
    struct Node* temp = *head;
    while (temp->next != NULL) {  // 遍历到链表末尾
        temp = temp->next;
    }
    temp->next = newNode;
    newNode->prev = temp;
}
- 从头部打印链表
void printList(struct Node* head) {
    struct Node* temp = head;
    while (temp != NULL) {
        printf("%d <-> ", temp->data);
        temp = temp->next;
    }
    printf("NULL\n");
}
- 从尾部打印链表
void printReverse(struct Node* head) {
    struct Node* temp = head;
    if (temp == NULL) return;

    // 遍历到链表末尾
    while (temp->next != NULL) {
        temp = temp->next;
    }

    // 从尾部向头部打印
    while (temp != NULL) {
        printf("%d <-> ", temp->data);
        temp = temp->prev;
    }
    printf("NULL\n");
}
- 删除节点
void deleteNode(struct Node** head, int key) {
    struct Node* temp = *head;

    // 找到要删除的节点
    while (temp != NULL && temp->data != key) {
        temp = temp->next;
    }

    if (temp == NULL) {  // 未找到节点
        printf("Node with data %d not found.\n", key);
        return;
    }

    if (temp->prev != NULL) {
        temp->prev->next = temp->next;
    } else {  // 删除头节点
        *head = temp->next;
    }

    if (temp->next != NULL) {
        temp->next->prev = temp->prev;
    }

    free(temp);
}
双向链表完整示例
int main() {
    struct Node* head = NULL;

    // 插入节点
    append(&head, 10);
    append(&head, 20);
    append(&head, 30);

    // 正序打印链表
    printf("Doubly Linked List: ");
    printList(head);

    // 倒序打印链表
    printf("Reverse List: ");
    printReverse(head);

    // 删除节点
    deleteNode(&head, 20);
    printf("After Deletion: ");
    printList(head);

    return 0;
}
总结
- 单向链表适合基本操作,结构简单。
- 双向链表可以在两个方向上遍历,适合需要频繁前后移动的操作。
- 操作中要特别注意指针的正确操作,避免内存泄漏或段错误 (
segmentation fault)。
在 C++ 中,可以使用类和指针来实现链表结构。以下是单向链表和双向链表的实现及常用操作的详细说明。
单向链表
定义单向链表节点
#include <iostream>
using namespace std;

// 定义单向链表节点
class Node {
public:
    int data;        // 节点数据
    Node* next;      // 指向下一个节点的指针

    Node(int val) : data(val), next(nullptr) {}  // 构造函数
};
定义单向链表类
class LinkedList {
private:
    Node* head;  // 指向头节点的指针

public:
    LinkedList() : head(nullptr) {}  // 构造函数

    // 添加节点到链表末尾
    void append(int data) {
        Node* newNode = new Node(data);
        if (head == nullptr) {
            head = newNode;
            return;
        }
        Node* temp = head;
        while (temp->next != nullptr) {
            temp = temp->next;
        }
        temp->next = newNode;
    }

    // 打印链表
    void printList() {
        Node* temp = head;
        while (temp != nullptr) {
            cout << temp->data << " -> ";
            temp = temp->next;
        }
        cout << "NULL" << endl;
    }

    // 删除指定值的节点
    void deleteNode(int key) {
        Node* temp = head;
        Node* prev = nullptr;

        // 删除头节点
        if (temp != nullptr && temp->data == key) {
            head = temp->next;
            delete temp;
            return;
        }

        // 查找要删除的节点
        while (temp != nullptr && temp->data != key) {
            prev = temp;
            temp = temp->next;
        }

        // 未找到节点
        if (temp == nullptr) {
            cout << "Node with value " << key << " not found." << endl;
            return;
        }

        // 删除节点
        prev->next = temp->next;
        delete temp;
    }

    // 析构函数:释放所有节点
    ~LinkedList() {
        Node* temp;
        while (head != nullptr) {
            temp = head;
            head = head->next;
            delete temp;
        }
    }
};
单向链表完整示例
int main() {
    LinkedList list;

    // 添加节点
    list.append(10);
    list.append(20);
    list.append(30);

    // 打印链表
    cout << "Linked List: ";
    list.printList();

    // 删除节点
    list.deleteNode(20);
    cout << "After Deletion: ";
    list.printList();

    return 0;
}
双向链表
定义双向链表节点
class Node {
public:
    int data;        // 节点数据
    Node* next;      // 指向下一个节点
    Node* prev;      // 指向前一个节点

    Node(int val) : data(val), next(nullptr), prev(nullptr) {}  // 构造函数
};
定义双向链表类
class DoublyLinkedList {
private:
    Node* head;  // 指向头节点

public:
    DoublyLinkedList() : head(nullptr) {}  // 构造函数

    // 添加节点到链表末尾
    void append(int data) {
        Node* newNode = new Node(data);
        if (head == nullptr) {
            head = newNode;
            return;
        }
        Node* temp = head;
        while (temp->next != nullptr) {
            temp = temp->next;
        }
        temp->next = newNode;
        newNode->prev = temp;
    }

    // 从头部打印链表
    void printList() {
        Node* temp = head;
        while (temp != nullptr) {
            cout << temp->data << " <-> ";
            temp = temp->next;
        }
        cout << "NULL" << endl;
    }

    // 从尾部打印链表(反向)
    void printReverse() {
        Node* temp = head;
        if (temp == nullptr) return;

        // 找到尾节点
        while (temp->next != nullptr) {
            temp = temp->next;
        }

        // 从尾节点向头打印
        while (temp != nullptr) {
            cout << temp->data << " <-> ";
            temp = temp->prev;
        }
        cout << "NULL" << endl;
    }

    // 删除指定值的节点
    void deleteNode(int key) {
        Node* temp = head;

        // 找到要删除的节点
        while (temp != nullptr && temp->data != key) {
            temp = temp->next;
        }

        // 未找到节点
        if (temp == nullptr) {
            cout << "Node with value " << key << " not found." << endl;
            return;
        }

        // 更新前后节点的指针
        if (temp->prev != nullptr) {
            temp->prev->next = temp->next;
        } else {  // 删除头节点
            head = temp->next;
        }

        if (temp->next != nullptr) {
            temp->next->prev = temp->prev;
        }

        delete temp;
    }

    // 析构函数:释放所有节点
    ~DoublyLinkedList() {
        Node* temp;
        while (head != nullptr) {
            temp = head;
            head = head->next;
            delete temp;
        }
    }
};
双向链表完整示例
int main() {
    DoublyLinkedList list;

    // 添加节点
    list.append(10);
    list.append(20);
    list.append(30);

    // 正序打印链表
    cout << "Doubly Linked List: ";
    list.printList();

    // 反序打印链表
    cout << "Reverse List: ";
    list.printReverse();

    // 删除节点
    list.deleteNode(20);
    cout << "After Deletion: ";
    list.printList();

    return 0;
}
总结
单向链表优点
- 结构简单,占用内存少。
- 适合只需要从头到尾遍历的场景。
双向链表优点
- 支持从头部和尾部两个方向遍历,操作更加灵活。
- 适合需要频繁插入、删除以及双向遍历的场景。
链表的实现中要特别注意内存管理,防止内存泄漏。在 C++ 中,可以使用智能指针(如 std::unique_ptr 或 std::shared_ptr)来简化内存管理工作。
附录:链表内存分配的常见疑问
Node* createList() {
    Node* head = (Node*)malloc(sizeof(Node)); // 创建头节点
    head->next = NULL; // 头节点的指针域初始化为NULL
    return head;
    //是(Node*)malloc(sizeof(Node))而不是(Node*)malloc(sizeof(Node*))
}
head 是一个指向 Node 类型的指针,而你要分配的内存是用来存储一个 Node 结构体的数据。因此,应该为 结构体本身 分配内存,而不是为指针分配内存。
malloc(sizeof(Node)) 的含义:
malloc(sizeof(Node))会根据Node结构体的大小分配内存。例如,假设Node结构体包含一个next指针(通常是Node*类型),那么sizeof(Node)就是Node结构体的总大小,包含next指针所占的空间。- 当你为
Node分配内存时,你实际上是为整个结构体分配空间,而不是为指针本身分配空间。指针只是用来指向那个结构体的。